ProPunch was designed to be installed and accessed on your local network. It is, however, possible to configure remote access to the ProPunch server to allow users and remote time clocks to access the application from outside of your local network.
Note: Acroprint neither supports this configuration nor offers any setup assistance and has only included the information below as guidance for your network administrator. Please contact your network administrator for setup assistance.
-
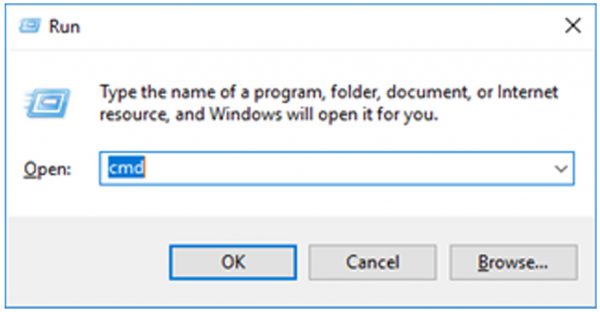
- On the computer/server on which the ProPunch Server is installed, open a command prompt window by pressing at the same time the Windows Logo key (between the left Ctrl and Alt key on the keyboard) and the letter R. The Run/Open prompt will appear. Type cmd and click OK.

- In the command prompt, type ipconfig and press Enter.
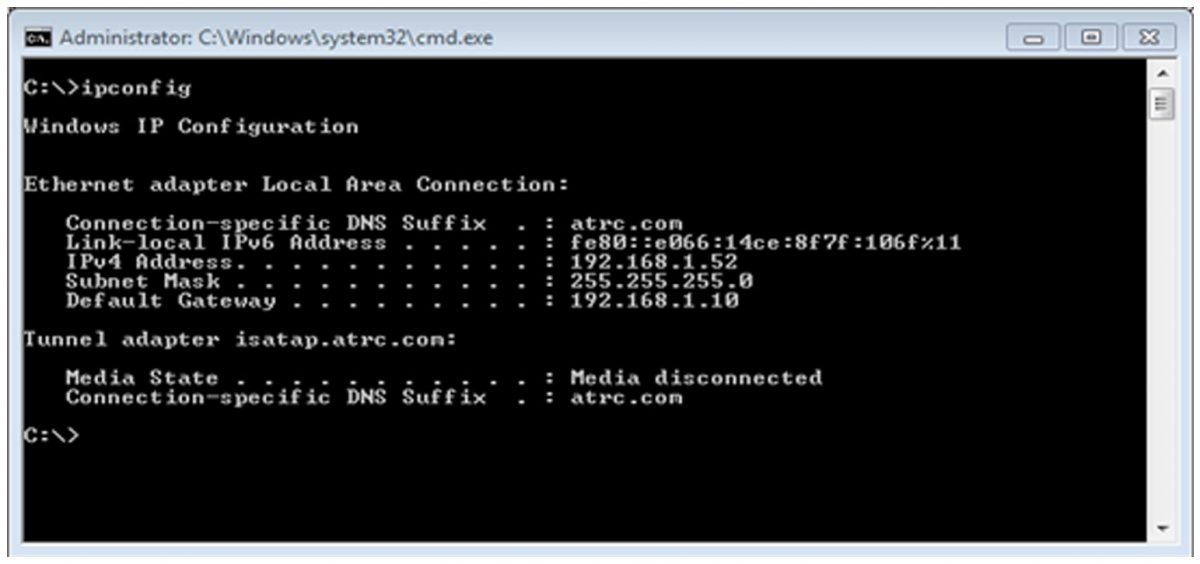
- Locate the IPv4 Address along with the Default Gateway of the router (in the image above IPv4 Address is 192.168.1.52 and Default Gateway is 192.168.1.10).
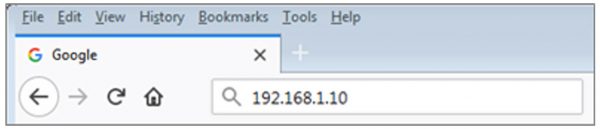
- Open the router’s interface page by typing the Default Gateway into your preferred web browser.
- Login with the router’s username and password. Skip this step if not prompted for a username and password. Type the username and password configured when the router was initially installed; otherwise, try one of these common default logins:
- Linksys routers — Type admin for both the username and the password.
- Netgear routers — Type admin for the username and password for the password.Note: Check your router’s manual to confirm the default password and username. Your router username and password may also be located on a sticker on the router. If you’ve forgotten your login information, you may have to reset the router.
- Locate the port forwarding section. Note: Since no two router pages look exactly the same, you may have to search the page for the port forwarding section. Check the router’s manual or online documentation.
- Add the port forwarding rule for the ProPunch server. Based on the example, typical settings for this rule:
- ProPunch ServerServer IP: 192.168.1.52 (IPv4 Address)Name or Description: ProPunch (some firewalls have default services to look for http)Type: TCPPort: 80 (if there is a range, select 80 for start and stop)
- Add the port forwarding rule for the ProPunch Clock. Based on the example, typical settings for this rule:
ProPunch Clock
Server IP: 192.168.1.52
Name or Description: ProPunch Clock
Type: TCP
Port: 7788
The ProPunch web site should now be accessible via the external IP address of your location. To complete the setup of the ProPunch Clock, the external IP address will need to be entered on the time clock:
- At the time clock, press MENU.
- Select Set COM and press OK.
- Select Ethernet and press OK. If DHCP = Yes, then verify Port No = 5005 and press ESC to return to the Set COM If DHCP = No, press OK, select Yes, and then press OK. Ensure Port No = 5005. Press ESC and then press OK to save the Ethernet setting.
- Select Server Setting and press OK.
- If Server Setting = No, press OK, select Yes, and then press OK.
- Select Server IP and press OK.
- Enter the external IPv4 Address of the ProPunch server. To navigate from one number group to the next, press OK. When done, press ESC.
- Ensure SerPortNo is set to 7788.
- Press ESC and press OK to save settings.
- Press ESC until Welcome screen appears
- On the computer/server on which the ProPunch Server is installed, open a command prompt window by pressing at the same time the Windows Logo key (between the left Ctrl and Alt key on the keyboard) and the letter R. The Run/Open prompt will appear. Type cmd and click OK.